Why we care about Contrast?
See the youtube video on this topic: Make Shop Pro - Contrast
Contrast is the difference in the lightest parts of an image compared to the darkest parts of an image. It is often the case that images coming off of a digital camera are not high contrast, and so to get that "rich", "deep" look, contrast needs to be added in post-processing. But why are there so many contrast tools in PaintShop Pro?

I'll walk through three different classes of contrast tools and explain how they are (or are not) related. The three classes are:
- Base Tools
- Shortcuts Tools
- Context Tools
Base Tools
Base tools are tools that can be used to achieve many of the shortcut tools that will be mentioned later. Essentially, base tools can perform many types of contrast operations, and shortcuts just make adjusting specific types of contrast easier/faster. This is a good part of the reason why there are so many contrast tools.In a woodworking analogy, one could recognize that most power tools are just a motor with a different apparatus attached to it. All saws, routers, sanders, are all driven by motor, but different bits, blades and belts attached. The base tools are the motor, and the bits are the shortcut tools.
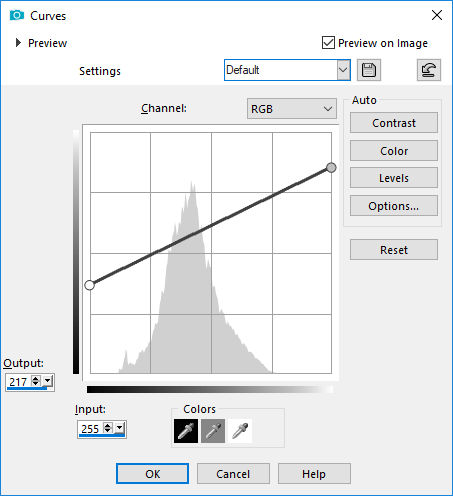
Curves
The curves tool can cover many of the shortcuts we will address later. This is in part because curves allows you to define the nature of the transfer function between Input (your image) and the output (modified result). The many different ways you can define the curve is what gives this tool so much flexibility.
In the simplest form, a curve with no effect is a straight line from bottom-left to the top-right. This means that for each luminance value on the x-axis, the equivalent output value is on the y-axis mapped by the point on the curve. So in this default setting, every input light value will have the same output light value, thus no change.

Histogram Adjustment
The Histogram Adjustment isn't technically a base tool, but it wraps a lot of different functionality into one tool. Essentially it gives you control of the same transfer function curve, but enforces some rules about the curve to prevent surreal images from being created. For example, the line can never be inverted.

Shortcuts
This second set of tools are the capabilities that are very narrow in what they do, but are very quick and easy to use. Many of them take one facet of the transfer function curve, and turn it into a slider.
Brightness/Contrast
Making the slope sharper (left image) increases the contrast.
Making the slope shallower (right image) decreases the contrast.
Raising the left point increases the brightness.
Lowering the right point decreases the brightness.

Gamma
In older versions of PaintShop Pro there used to be a tool called Gamma Correction which gave you the adjustment shown below. There was a single point in the middle of the curve that could be pulled to the top-left or bottom-right. Doing this adds a brightness adjustment that it is more gradual in nature than the linear approach found in B&C.
This is also equivalent to moving the middle slider only in the Levels tool.

Threshold
Using the threshold tool makes every pixel in the image either pure white or pure black depending on whether the original contrast value is above or below the threshold value. This is the same thing as adding two points to curves and arranging them in the manner shown below. The vertical line represents the threshold value.

Negative Image
This doesn't have to do with contrast but was worth mentioning in terms of the kinds of effects that can be achieved with the Curves tool. In concept, inverting the slope so that it decreases from left to right, will give the negative image effect. The curve can take many different shapes, and in general, if any point of the curve has a negative slope (such as this), the image will have a surreal look to it.

Levels
Levels gives you the upper and lower ends of brightening and darkening a photo, while also providing gamma control with the middle slider. What makes this tool so powerful however is that by sliding the right or left slider, the middle (gamma) slider is moved proportionally, giving the image a very natural look while increasing the contrast.
This is the tool I use the most often when applying a base level of contrast.

Histogram Stretch
This next aims to stretch the histogram such that all the darkest value reaches zero and the lightest value reaches 255. Hence if you have an image that already achieves that dynamic range, this adjustment wouldn't do anything.
Conceptually this could be similar to using the end sliders on levels and bringing them in tighter so that the lightest value achieves 255 and the darkest value achieves zero.

Histogram Equalizer
Eequalizer is a bit different, and I'm not so sure that it's ability can be replicated via the Curves tool. Looking at the histogram difference, the approach here seems to be a redistribution of the light values to try to achieve a more flat allocation of light across the luminance spectrum. So instead that large amount of gray in the middles of the histrogram, it has been flattened and distributed to the left and right.
This may have some application in images that have a strong luminance region that is hard to work with (too dark or too bright), and you want to normalize the image first before working on it. However, you'll want to get a good feel of what it does to images by experimenting with it.

Context
The following tools (as far as I can tell) don't follow the same paradigm of reflecting effects as a product of the standard curves transfer function, but rather are highly dependent on the image data itself to determine how the contrast is applied.
Lightness/Clarify
From my experimentation of the use of this tool, I see this as very similar to the approach of using Unsharp Mask, and cranking the radius as high as possible. In another post I explain what sharpness is and that really it's a matter of applying localized contrast.
The clarify tool seems to be a tool that has taken this concept and made simple sliders out of it.

Tone Mapping
This tool first came out when High Dynamic Range (HDR) photography was emerging as a "thing". Since then it seems to have made it's way as a stand-alone contrast type tool. I won't claim to understand the mechanics behind it, nor have I found a tool that can mimic it's capability.
This is one that take some experimenting with to see what type of contrast it produces, and knowing when you want that kind of look.

Decreasing Contrast
Note that not all tools can apply de-contrast. The following are the list of tools already mentioned that can apply de-contrast.
- Brightness/Contrast
- Base Tools
- Fill/Clarify
Comments
Post a Comment